Bike Helmet Program
Bicycle helmets are the single most effective piece of safety equipment for riders of all ages.
A properly fitted helmet can reduce the risk of head injury by up to 85%. Studies have estimated that bicycle injuries account for 1.2 million doctor’s clinic visits, 580,000 emergency department visits, 23,000 hospital admissions, and 900 deaths each year in the United States.

South Beach RFA maintains a supply of bike helmets to be distributed to any person in need of a helmet who requests one.
If you need a bike helmet, please contact South Beach RFA. We are happy to give you one at no charge, one per person.
Fitting your bike helmet
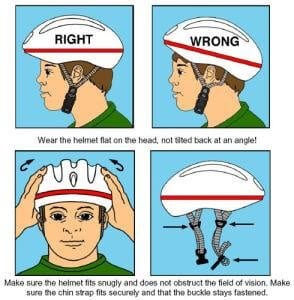
Step 1 – Size: Measure your head to find your size. Try on several helmets in your size until one feels right. Now put the helmet level on your head and adjust the sizing pads or fit ring until the helmet is snug.
Step 2 – Position: The helmet should sit level on your head and low on your forehead – one or two finger-widths above your eyebrow.
Step 3 – Side straps: Adjust the slider on both straps to form a “V” shape under and slightly in front of the ears. Lock the slider if possible.
Step 4 – Buckles: Center the left buckle under the chin. On most helmets, the straps can be pulled from the back of the helmet to lengthen or shorten the chin straps. This task is easier if you take the helmet off to make these adjustments.
Step 5 – Chin strap: Buckle your chin strap. Tighten the strap until it’s snug, so that no more than two fingers fit under the strap.
Step 6 – Final fitting:
- Does your helmet fit right? Open your mouth wide—big yawn! The helmet should pull down on your head. If not, refer back to step 5 and tighten the chin strap.
- Does your helmet rock back more than two fingers above the eyebrows? If so, unbuckle and shorten the front strap by moving the slider forward. Buckle and retighten the chin strap, and test again.
- Does your helmet rock forward into your eyes? If so, unbuckle and tighten the back strap by moving the slider back toward the ear. Buckle and retighten the chin strap, and test again.
- Roll the rubber band down to the buckle. All four straps must go through the rubber band and be close to the buckle to prevent the buckle from slipping.
For more information on bicycle safety, visit the National Highway Traffic Safety Administration website at www.nhtsa.dot.gov/bicycles.
Remember: once your helmet has been involved in a crash, it needs to be replaced immediately, even if there are no visible signs of damage.
Important:
When you are riding a bicycle:
- Don’t wear loose clothes. Never wear a hat under your helmet and make sure your helmet has a CPSC sticker (U.S. Consumer Product Safety Commission).
- Stay visible! Remember, just because you can see a driver doesn’t mean they can see you. Make sure your bicycle has reflectors, and wear bright colors.
- Make sure your bicycle is ready to ride. Don’t forget to check your tires.
- Stay alert. Don’t listen to music, talk on your phone, or text while riding.
- Follow the rules of the road. Go with the traffic flow. Stop at all stop signs and red lights. Ride in a straight line, not in and out of cars. Signal your moves to others.